Article 4: X-wing Basics 2, Vector Maps
Last
time I talked about using imaginary “threat maps” to as a way to visualize the
threat posed by a ship to various places on the board. They key item to
remember from that article is that every threat map is context dependent.
It depends on what tokens you have, what tokens the opponent has, what your
goals are for the turn, and for the game. However useful this idea of
threat maps is, it’s really only a small part of the story. Much like a
knife isn’t much danger sitting on a table, a ship won’t pose a threat simply
by existing. It must be put somewhere where the threat map it generates
can accomplish something to help you (or your opponent) win the game.
This is, of course, where the ship’s dial comes in. The dial is what
we’ll focus on today.
Let’s
look again at the humble X-wing. Figure 1 shows most of the places its
dial could take it, along with the firing arcs from all those positions (this
figure made possible by the greatness of the X-wing Vassal mod. Check out xwvassal.info, thanks mu0n, you’re
amazing). We’ll call this a vector map, but it’s a rudimentary one,
because it doesn’t take into account the Barrel Roll options (or the red
moves). Barrel Rolls increase the area that can be covered by the X-wing
and its threat map, but they do drop the intensity of its threat map when
they’re used, because the action used to Focus or Target Lock is now used to
reposition.
 |
| Figure 1: Basic Vector Map. |
 |
| Figure 2: Vector Map with an nearby asteroid. |
This
does a couple of things. The big effect
is that the overlapping maneuvers cut off those firing arcs. You’re no longer worried about positions that
can only be threatened by the 3-turn or the faster banks. Additionally, there are positions where the
obstruction granted by the asteroid grants the additional defense die, reducing the risk associated with being there.
On top of the direct overlapping, the 1-bank is a dangerous move for the
X-wing, as it necessitates a Barrel Roll to avoid passing over the asteroid the
following turn. These factors make that region
threatened only by the 1-bank look pretty good.
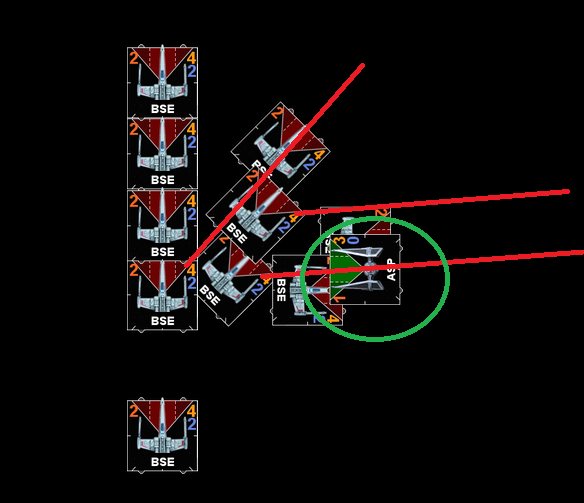 |
| Figure 3: Improving survival through blocking. |
The TIE Interceptor moves first, and reaches its position (green
circle) before the X-wing moves. There
is exactly one maneuver the X-wing can take where it can fire at that
Interceptor, the 1-bank. If you think
your opponent has a good reason to dial in that 1-bank, you might be out of
luck, but the Interceptor is safe in any other of the positions shown. Inducing overlaps can
do more than keep a ship safe, however.
It can protect friendly ships as well.
At the very least, it robs the higher initiative ship of an action,
which is always useful. Additionally, it
can protect allied ships from receiving any shots at all from the blocked
ship. Figure 4 shows two different
positions occupied by a blocked and unblocked X-wing (the blocking TIE
Interceptor is hiding in that green circle).
If unblocked, the ship’s arc threatens a certain region. By being blocked, however the threatened
region is shifted about 45 degrees (in this particular example). This leaves an entire are open for the
Interceptor’s allies to move into and be free of shots from the X-wing.
 |
| Figure 4: Changing firing arc angle through blocking. |
A
dramatic and perhaps more relevant example (as of Oct 2018) is the vector map
of Redline loaded with Proton Torpedoes.
Any of the white or blue moves he makes can result in a TL/Focus shot
with a 4-dice proton torpedo at Range 2-3.
The position map looks a lot like the X-wing’s (although it bears to
keep in mind the position coloring looks at the number of moves on a dial that
threaten an area, not about the intensity of that threat). Already a key difference arises,
however. The Punisher dial has just one
white turn maneuver, the 2-turn. If it
wants to engage to its flank it either has to use that one maneuver or boost
off of a bank turn, which reduces the average damage of the torpedo shot and takes
the ship into a substantially different position than the 2-turn. This provides the opponent of Redline with a
key bit of knowledge: the Punisher that
wants to attack to its flank with maximum strength is stuck with one
maneuver.
 |
| Figure 5: Redline's Vector Map. |
That one maneuver can still threaten an enormous area, however, thanks to Redline’s ability to get a lock after any other action, he can Boost or Barrel Roll and still get a lock. It’s not a double modified shot, but a Proton Torpedo with re-rolls is still a pretty stout attack. It’s worth building an individual position map for all of the options available to just one maneuver (the 2-turn, in this case) (Fig. 6). In addition to the vector map, we can also look at the threat map generated by Redline from that 2-turn (Fig. 7).
 |
| Figure 6: Vector Map of Redline from just the 2-turn. |
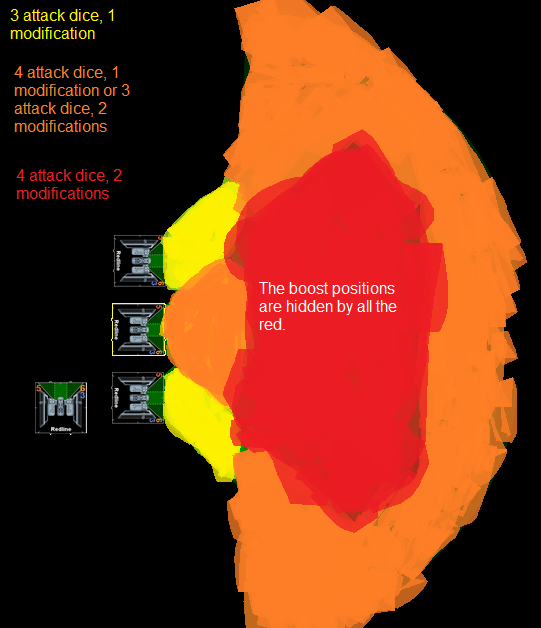 |
| Figure 7: Threat Map of Redline from just the 2-turn. |
Together,
these maps give a pretty strong indication about where a ship really doesn’t
want to be. That central region, covered
by orange in the position map and red in the threat map, is the place where a
ship can be engaged with the widest number of repositioning options (useful
information if there are obstacles or other pressures that make repositioning a
desirable thing for Redline to do). It’s
also the region where Redline can deliver the highest quality attack. In essence there is very little reason to
expect a turn to give many dividends if you have a ship that parks itself
there. However, these maps also
illuminate places where ships may operate with some expectation of safety. The green areas of the position map are
threatened by a single repositioning option.
If there is some factor, like an asteroid or another ship that punishes or
prevents a reposition to that location, those spaces become fairly safe. Likewise, if an asteroid provides cover from
a torpedo shot powered only by the Target Lock reroll and the target ship has a
token for defense, it might be considered an acceptable time to soak a Proton
Torpedo shot.
The size of the the areas that Redline can threaten with such high offense is surely one of reasons the ship has seen so much competitive play in the early months of X-wing 2.0.
To
leave you with a note of hope. Remember the sure-thing safe zone of
blocking. Not only does it mean that
Redline cannot fire at the blocking ship, it means his threat map goes from
Figure 7, to Figure 8.
 |
| Figure 8: Threat Map of Redline blocked. |
Thanks for reading.
It’s a
good thing everyone likes Trajectory Simulator instead of Advanced
Sensors.

Comments
Post a Comment